When you see any lapis cake, I guess everyone will straight forward say
wow nice cake but fattening, time consuming to bake blah blah blah ….
so do I.
I felt lazy whenever the
thought of long hours of preparing & baking it, however, for every Chinese
New Year, at least I will try to bake one lapis cake (provided time is allowed).
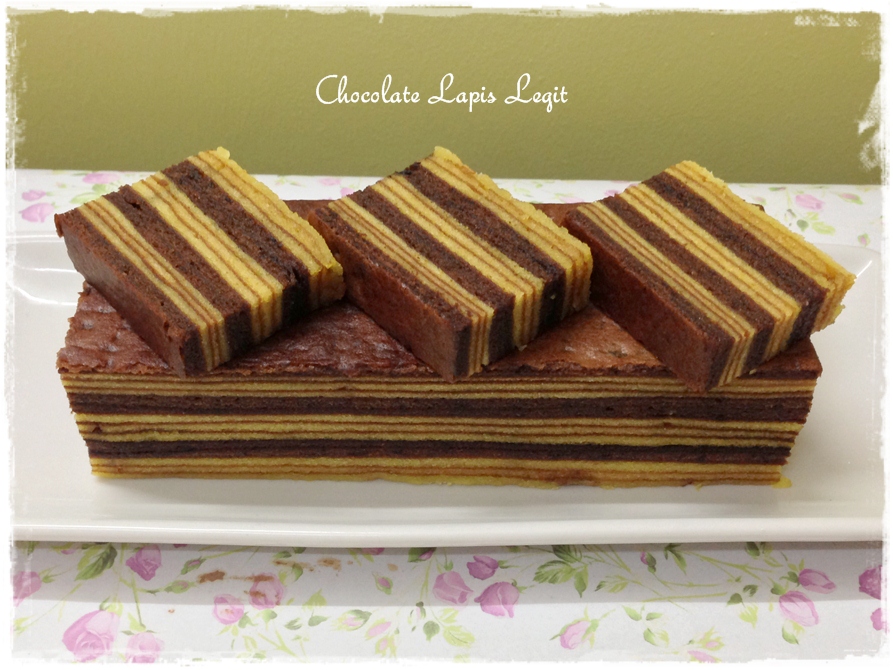
I just love the taste of rich, aromatic, moist and not to forget it is highly
addictive cake…. just can’t stop at only one slice. :)
Here are “Some good tip and tricks for baking lapis cake shared by Sweet Samsations” that you may check it
out before you bake.

Source : Ny Liem's Lapis Legit Coklat with modification
Ingredients:
A:35 Egg yolks
4 Egg white
10 gr Cake Emulsifier/Ovallete
1 tsp Vanilla Extract
350 gr Icing Sugar
B:
600 gr Chilled Salted Butter
2 tbsp Condense milk
C:
50 gr Cake flour
20 gr Corn flour
20 gr Milk powder
D:
30 gr Chocolate powder
1 tbsp Chocolate paste
50 gr butter cream
Method:
- Cream butter (600+50 gr) until pale and fluffy. Put aside 50 gr of butter and will be used for Ingredients (D). Add condensed milk to the remaining 600 gr butter, cream or mix well and set aside.
- Beat Ingredients (A) until thick & fluffy. Fold in the creamy 600 gr butter – Ingredients (B) and evenly mix.
- Fold in Ingredients (C) with spatula until the mixture is well incorporated.
- Take 1/3 of the batter (around 750 gr), mix it with Ingredients (D) until incorporated, set aside.
- Place the baking paper on the preheated 9x9 inch tin. Spread thinly approx. 110 gr of yellow batter to the tin and bake the first layer at the centre rack with top-bottom heat at 200C. It should take 5-10 mins until brown.
- Then bake the next layer until the last layer using top heat. Try to bake it each layer not more than 5 mins or else, the cake will turn hard.
- Use back spoon to press lightly to flatten each layer while you mixed the batter in the tray.
- For chocolate layer, I weigh 115 gr each.
- Every three layers of yellow, I add 2 chocolate layers. Continue baking the cake by the layers until the batter uses up.
-When the last layer is finish, cover with aluminium foil, using top bottom heat …. bake the cake again at 180C for about 10 mins.
- Remove from oven and leave to cool before slicing.

I’m submitting this post to:
- Aspiring Bakers #27:Through Thick and Thin – Kue Lapis Classics hosted by Sweet Samsations- Chinese New Year Delights 2013 hosted by Sonia aka Nasi Lemak Lover
look very good taste。
ReplyDeletethis looks so pretty :) Happy Valentine's Day
ReplyDeleteHi Does, Happy New Year! Very neat and nice layers. Do you use the canned butter or those ordinary butter we use in cakes and cookies? Must the butter be chilled before we craem? Thank you!
ReplyDeleteThanks Eileen. Yes, I normally will use golden churn canned butter. If you be able to get Wijsman Dutch Butter (just like what Sweet Samsations sharing with us), mixed 1/3 of it. Chilled it before used, so it won't get easily melted (I guess).
DeleteYou may get Wijsman butter at Belanja.com or buy it during your trip to BATAM or Indonesia. :)
Hi Doris, Happy Lunar New Year to you and your family! Xin Nian Kuai Le & Gong Xi Fa Cai!
ReplyDeleteHappy Lunar New Year to you and your family!
ReplyDeleteYummy lapis!
Very very pretty and neat lapis.
ReplyDeleteI don't think I will have the patience to make this labour-intensive cake.
Hi Angel,
DeleteThanks for the compliment. I am pretty sure, with your delicate hands, you can do it much much better than mine :)
Omg! Gorgeous lapis you've got there! I absolutely love chocolate flavoured lapis! The layering done here is so professional! Looks even better than Holland Bakery! :p thanks for the link up dear! :)
ReplyDeleteThanks Sammie for hosting this event and the compliment. Looking forward to the roundup lapis cake soon.
DeleteHi Doris,
ReplyDeleteI'm admiring the perfect layering of your lapis cake. Your cake look not just pretty but delicious too... Thinking that my husband and son will love the in-between chocolate layers of this cake.
Zoe
Hi Zoe,
DeleteThank you. Try make one soon, I'm sure your DH & DS sure will love it :)
This is so beautiful. I think it's worth the time and effort to make one. Especially for the CNY! I love those chocolate layers you add in them. Much more decadent! :) Wish you and your family a healthy and happy Year of Snake.
ReplyDeleteHi DG! I'm back in action! Haha! Thanks for visiting my blog, and welcoming me back. Your lapis is super neat, neater than store bought ones! I'm sure it's really yummy too, I wanna eat them nowwwwwww... Hehe
ReplyDeleteDG, I am so late to come over to see your cake but better late than never! You have baked a beautiful cake. Yah, me is one of those who will complain the cake is too much work blah..blah..blah...
ReplyDeleteThank you Phong Hong. :)
Deletethis looks lovely! I may try this with orange and chocolate combination :)
ReplyDeleteThanks Rachel, that will be another great combination.
DeleteAdmiring the beautiful outcome but am not sure if I can do the same. Love to dig into a piece of it.
ReplyDeleteHi Navaneetham,
DeleteThanks for the compliments, I believe you can do much better than mine. You really have interesting blog.
If you are in need of the powerful Wisjman butter (the "must" butter for kueh lapis), please contact me as I have some extra stocks to sell. Thank you.
ReplyDeleteHai doris, i always admire your baking, this time i want to try baking this recipe, can i know the cake flour is the same as self raising flour? 😊
ReplyDeleteHi Anon,
DeleteThanks for the compliments :) Cake flour is low protein flour and is not the same as Self-raising Flour (which has Baking powder in it)