Chocolate Lapis Legit


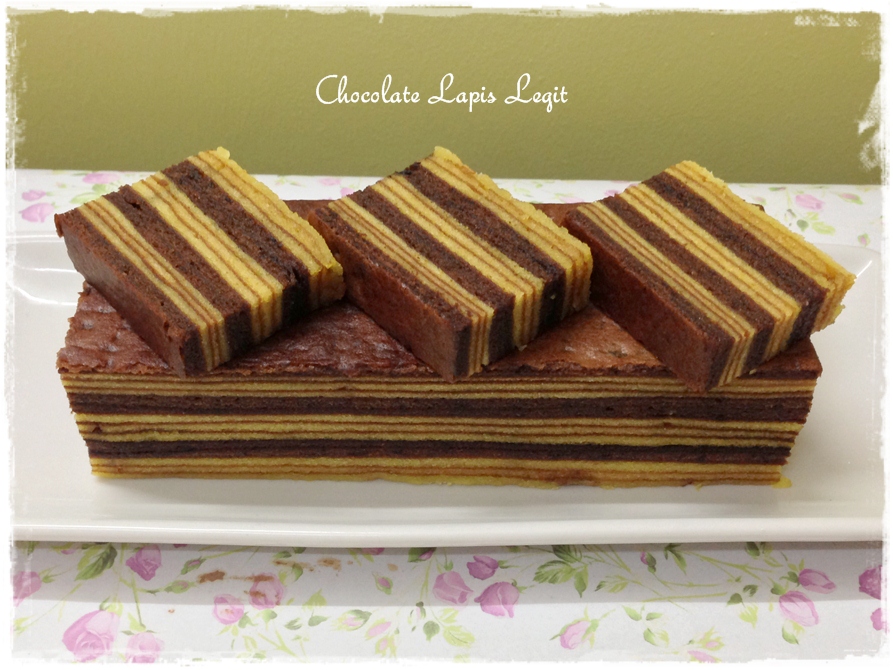
When you see any lapis cake, I guess everyone will straight forward say
wow nice cake but fattening, time consuming to bake blah blah blah ….
so do I.

I felt lazy whenever the thought of long hours of preparing & baking it, however, for every Chinese New Year, at least I will try to bake one lapis cake (provided time is allowed). I just love the taste of rich, aromatic, moist and not to forget it is highly addictive cake…. just can’t stop at only one slice. :)

Here are “Some good tip and tricks for baking lapis cake shared by Sweet Samsations” that you may check it out before you bake.


Source : Ny Liem's Lapis Legit Coklat with modification

Ingredients:
A:
35 Egg yolks
4 Egg white
10 gr Cake Emulsifier/Ovallete

1 tsp Vanilla Extract
350 gr Icing Sugar

B:

600 gr Chilled Salted Butter
2 tbsp Condense milk

C:

50 gr Cake flour
20 gr Corn flour
20 gr Milk powder

D:

30 gr Chocolate powder
1 tbsp Chocolate paste
50 gr butter cream

Method:

- Cream butter (600+50 gr) until pale and fluffy. Put aside 50 gr of butter and will be used for Ingredients (D). Add condensed milk to the remaining 600 gr butter, cream or mix well and set aside.
- Beat Ingredients (A) until thick & fluffy. Fold in the creamy 600 gr butter – Ingredients (B) and evenly mix.
- Fold in Ingredients (C) with spatula until the mixture is well incorporated.
- Take 1/3 of the batter (around 750 gr), mix it with Ingredients (D) until incorporated, set aside.
- Place the baking paper on the preheated 9x9 inch tin. Spread thinly approx. 110 gr of yellow batter to the tin and bake the first layer at the centre rack with top-bottom heat at 200C. It should take 5-10 mins until brown.
- Then bake the next layer until the last layer using top heat. Try to bake it each layer not more than 5 mins or else, the cake will turn hard.
- Use back spoon to press lightly to flatten each layer while you mixed the batter in the tray.
- For chocolate layer, I weigh 115 gr each.
- Every three layers of yellow, I add 2 chocolate layers. Continue baking the cake by the layers until the batter uses up.
-When the last layer is finish, cover with aluminium foil, using top bottom heat …. bake the cake again at 180C for about 10 mins.
- Remove from oven and leave to cool before slicing.


I’m submitting this post to:
- Aspiring Bakers #27:Through Thick and Thin – Kue Lapis Classics hosted by Sweet Samsations
- Chinese New Year Delights 2013 hosted by Sonia aka Nasi Lemak Lover

Chocolate Chip Shortbread


Ingredients:
225 Salted butter, at room temperature
130 gr Caster Sugar ( I used only 105 gr )
½ tsp Vanilla Extract
250 gr All purpose Flour
120 gr Mini Chocolate Chips

Method:
- Beat the butter and sugar on medium speed for about 3 mins, until pale and smooth.
- Add in vanilla, then reduce mixer speed to low and add the flour, don’t overmix, stop once the flour is incorporated.
- Fold in the chocolate chips with spatula.
- Transfer the soft, sticky dough to a zipper or plastic bag (see below picture). Put the bag on a flat surface, roll on the thickness you prefer. Refrigerate the dough for at least 2 hours or for up to 2 days ( I did it one day in advance ).


- Preheat oven to 160C
- Put the hardened dough on the flat surface and slit it open. Cut the dough into 1 - 1.5 inch squares (see above picture) and transfer it to the baking sheets on the tray and carefully prick each one twice with a fork.
- Bake for 15-17mins, the shortbreads will be very pale and well baked, they shouldn’t take on much colour.
- Leave to cool thoroughly before storing in container.

Yields : One small bottle container


I am submitting this post to Chinese New Year Delights 2013 hosted by Sonia aka Nasi Lemak Lover. And also I would like to wish all have a prosperous and fruitful water snake year :)

Pandan Flavour Cookies


Source : Y3K Cookies by Alan Ooi via Happy Flour

Ingredients:
130 gr Butter
70 gr Shortening  ( I used margarine )
130 gr Icing sugar

2 Eggs
1 tsp Pandan paste

260g Cake flour
¼ tsp Baking powder
40g Hoen kwee flour or Green pea flour
20g Custard powder
20g Coconut powder

Some red dried cherries (diced) for topping (optional)

Method:
- Preheat oven to 165C.
- Sift all the flour and baking powder together and set aside.
- Cream butter, shortening and icing sugar together until light and fluffy.
- Lightly beat in the eggs and pandan paste, then add to butter batter.
- Fold in all the shifted flour to form a soft dough.
- Spoon dough into a piping bag fitted with a star nozzle and pipe onto baking tray and places the diced cherry on top.
-  Bake in a preheated oven for 15-20mins. The cookies must be well-baked but not brown.
- Leave to cool thoroughly before storing in container.

Yields : approx. one and half small container 


Not to forget J I am submitting this post to Chinese New YearDelights 2013, hosted by Sonia aka Nasi Lemak Lover.

Cheese Pineapple Tarts


Ingredients:
Dough:
150 gr Hard Butter
45 gr Icing sugar 
1 Egg Yolk
½ tsp Vanila extract
200 gr Plain Flour
40 gr Corn Flour
10 gr Parmesan cheese

1 Egg Yolk + 1 tsp water for egg wash
Shredded Cheddar Cheese for toping

Pineapple Filling

Method:
- Preheat the oven to 160C.
- Cream Butter and icing sugar until creamy & fluffy. Add egg yolk and vanilla, whisk until mixed well.
- Add cheese and combined flour (divide into 2-3 times), mix well to form a dough.
- Cover and rest dough in the fridge for 15-30 mins.
- Scale pineapple filling at 6 gr and roll into a ball.
- Pinch some dough and scale it at 7 gr each.
- Flatten the dough, place in the filling and seal into a ball.
- Brush tarts with egg wash and sprinkle the shredded cheese on top.
- Bake in a preheated oven for 20 minutes until slightly brown.
- Remove from oven and cool on a wire rack.

Yields : approx. 40-50 cookies depend on the size ( about 1 small container plus )


Here, I'm submitting this post to Chinese New Year Delights 2013, hosted by Sonia aka Nasi Lemak Lover.

Beside this, I would also like to link this post to "Pineapple Events" - Little Thumbs Up hosted by Zoe of Bake for Happy Kids, organised by Bake for Happy Kids and My Little Favourite DIY.

Photobucket