Rich Chocolate cake with cheese cake cubes inside


After finished cutting my Cheddar Cheese Ogura cake in cube shape (see previous post), I had left over from the side parts of the cake.
Inspired by “Once Upon a Pedestal”, I cut it into small chunks, and mix it with the chocolate batter. Voila …. the result is quite impressive hahahahaaa :)

Source : Fruit Art Bakery with modification

Ingredients:
A:
35 gr Oil
55 gr Fresh milk
20 gr Cocoa powder

B:
70 gr Dark Chocolate

C:
130 gr Egg white
85 gr Caster sugar

D:
65 gr Egg yolk

E:
55 gr Cake Flour
1/4 tsp Baking soda

Cheese cake or Sponge cake, cut into cube (Optional)

Chocolate Frosting:
150 gr Dark Chocolate
75 gr Whip cream
1 tsp Butter

Method:
- Preheat oven 180C
- Heat oil and milk until hot, remove from fire. Add the cocoa powder and mix well with a whisk or spoon.
- Using double boil method, add the dark chocolate into the cocoa powder batter and stir until dissolved and set aside to let it cool.
- Whisk the egg whites and sugar until medium peak.
- Once the chocolate slightly cool, while keep stirring the chocolate, add the egg yolks then follow with the flour mixture (E), stir until well combined.
- Take 1/3 of egg whites batter to the chocolate batter, mix well.
- Then partially pour the chocolate batter to the remaining egg whites batter, mix until well combined.
- Pour half batter into 8 inch square mould, spread the cheese cake cubes on top, then pour the rest of the batter. ( If you prefer higher cake, you may bake into 6-7 inch round pan and longer time to bake at 160C )
- Bake for 30-40 minutes or until cooked.
- Remove cake from the oven and remove the cake from the mould immediately.
- Frosting : Using double boil method to make hot the whip cream, once hot, add chocolate, stir until dissolved, add butter, stir until well combined.
- Once the cake cool, spread the chocolate frosting on the cake, then refrigerate for at least 15 mins, and ready to serve.


Pandan Slice Cheese Cakes


I am submitting this post to “Pandan –Little Thumbs Up” hosted by Joceline of Butter, Flour & Me, organized by Bake for Happy Kids and My Little Favourite DIY.


Source : Hanamemories with modification

Ingredients:
150 gr Milk
4-5 pcs Pandan leaves
50 gr Butter
4 pcs Sliced cheddar cheese (cut into smaller pieces)
Pandan paste few drops for colouring

50g cake flour
20g corn flour
4 Egg yolks

4 gr egg whites
70 gr caster sugar
¼ tsp cream of tartar

Method:
- Preheated oven to 170C
- Blend the pandan leaves with milk, then squeeze to extract the juice. Discard the pulp.
- Melt pandan milk, butter and sliced cheese using low heat and stir until well incorporated. Remove from fire, set aside and leave to cool.
- Whisk egg whites, cream of tartar until foamy, add in sugar and continue whisk until medium peak form.
- Beat egg yolks in the separate bowl until thick & lighter. While keep beating the batter, add in cheese batter, then the flour slowly pour in. Mix until well combined.
- Sieve the egg yolks and flour batter into another clean bowl.
- Take 1/3 of white eggs batter to the cheese mixture, mix well.
- Then partially pour the cheese mixture to the remaining egg whites, mix until well combined.
- OPTIONAL : Take two spoons batter in separate bowl, mix with pandan paste to make marble looks.
- Pour into 7 inch round pan or cupcake moulds, wrapped with aluminum foil.
- Bake in water bath or bain marie at 170C for 20 minutes then change to 150C for 40 mins or until set and golden brown.
- Leave to cool in oven for at least 10 mins with open door ajar. Unmold the cake, leave it cool.
 
Yields : 22 pcs cupcakes size
 

Chocolate Ice-cream Mini Mooncakes


Quick and easy mooncakes to make, what you need only 2 ingredients : chocolate and ice cream. :)

 
Ingredients:
200 gr Dark Cooking Chocolate
100 gr your favourite ice cream (here I used Oreo ice cream)

Method:
- Let the ice cream sit at room temperature so that it become soft.
- Melt the chocolate in double boil method, using small heat, until it completely melted.
- Spread thinly the chocolate into the mooncake mould, and make sure the chocolate completely covering the surface of the mould.
- Put the mould in the freezer for 5 minutes or until the chocolate harden.
- Take the chocolate mould out of the freezer. Finish filling 80% with the melted ice cream, remain with some room left at the top.
- Put the tray back into the freezer for 30 minutes or until the ice cream harden. Spread the remaining melted chocolate over the top and smooth with back spoon. Put it back to the freezer for 30 minutes.
- Then, turn the mould over and press or tap gently to remove the mooncakes.

Please note the below ingredients only for the below size of mooncake plastic mould, you may change slightly depend on the size of your mould.


Wishing All Happy Mid-Autumn Festival!


Old Fashioned Butter Cake


When I saw Catherine baked her old fashion butter cake in an unique pattern way, I bookmarked her recipe and finally got chance to bake it last weekend. Although the recipe uses a lot of eggs, you won’t really feel like you’re eating eggs :)  ... in fact it taste nice and has soft texture, moist and not too rich.

I baked half into marble, so the kids had more choices :)


Ingredients:
250 gr  Chilled butter
130 gr  Castor sugar (I used 140 gr)
8 Egg yolks
1 tsp Vanilla extract
240 gr  Cake flour (sifted together with baking powder)
1 tsp  Baking powder
40 ml  Milk

 
8 Egg white
1/8 tsp Cream of tartar
60 gr Sugar

 
Optional (for marble effect)
1 tsp Cocoa powder + 1 drop chocolate paste

 
Methods:
- Preheat oven at 160 C to 170 C. Lightly grease the base of a 8" square or round cake pan and line the bottom of the pan with parchment paper.
- Cream butter and 140g of sugar until light and fluffy
- Add egg yolks one at a time, beating well after each addition. Add vanilla extract.
- Fold in the flour mixture and milk in 2 or 3 batches.
- In a separate bowl, whisk the egg whites with Cream of tartar until foamy. Gradually add the remainder 60g of sugar and whisk until stiff peak.
- Fold butter mixture into the white eggs until well-blended. Do not over fold or the egg will deflate.
- If you would like to make marble effect, get ¼ portions of the batter and mix with the cocoa powder and chocolate paste.
- Bake for 45 mins at 170C and lower to 150 C for another 15 mins or until a skewer inserted in the center of the cake turns out clean. ( As I baked 30 mins 170C and continue with 160C for another 30 mins) (Cover up with aluminium foil if you see the cake turns brown too quickly and continue bake until cook)
 - Remove cake from oven and let it cool for 5 minutes before inverting (pan still intact) onto a cooling rack.


Chocolate Swiss Roll - Revisited


Recipe can be found here. However this time, I just used chocolate whip cream for the filling.


Super Fudgy Brownies


Try few brownies so far, in fact this will be the BEST brownies I have ever made. A good blend of fudgy and chewy, it is just the way I like them to be :). Be sure to use a good quality of dark chocolate then it definitely will satisfy your craving :)


Source : Martha Stewart via Ricke's Ordinary Kitchen

Ingredients
120 gr Unsalted butter, cut into pieces, plus more for pan
225 gr Semisweet or bittersweet chocolate, chopped
200 gr Sugar (original 280 gr)
3 large eggs
1 tsp Vanilla Extract
130 gr All-purpose flour
30 gr Cocoa powder
1/2 tsp Baking powder
1/2 tsp Salt

50 gr chocolate converture droplet / chocolate chips (optional)

Method:
- Using double boil method, melt the butter and chocolate, stir together until melted and mixed. Add sugar, stir awhile and switch off fire, mix to combine ( worry if the sugar not melted ). Set aside.
- Preheat your oven to 180C
- Add eggs and vanilla, mix to combine. ( I modify a bit, since I don’t like my brownies to be gooey texture, instead I beat the eggs by hand mixer (non-machine) until incorporated (not so long), then add the melted chocolate in 3 times until well incorporated ).
- Add in the shifted flour, cocoa powder, BP, salt and chocolate droplet, mix just until moistened ( do not overmix ).
- Transfer batter to 8 or 9 inch pan, smooth top.
- Bake for 50 mins (check below update) or until a toothpick inserted in center comes out with a few moist crumbs attached.
- Cool in pan for at least 30 mins ( I just leave it to cool in a pan and transfer out before cutting ).

UPDATED (29/06/15): I baked it again, however, this time, I'm not too sure, it's a bit dry for 50 mins. So, next time I will bake for 25 mins.

Steamed Sweet Potato Mantou


With additional sweet potato into the recipe, it really make the mantous taste even nicer & fragrant than the standard white mantou.
And instead of normal mantou roll shape, just for fun, I made it into donut shape :) Here are the look of healthy donuts :))


Source : Wendyywy - Table of Two or more

Ingredients: - recipe in half
A
5.5 gr Instant yeast
¼ tsp Sugar
75 ml Water

B
250 gr Pau flour
125 gr Steamed Orange Sweet Potato
50 gr Sugar
½ Tbsp Double action baking powder
¼ tsp Salt

20 gr Shortening, melted

Filling – chocolate chips & salted egg yolks custard (optional)

Method: (Using a Dough Mixer or Hand Knead)
- Proof A until it froths.
- Mix B, knead it until the mixture will look crumbly
- Pour in yeast mixture (A), knead until it smooth and no longer sticky.
- Add in the melted shortening, knead until dough no longer feels oily.
- Shape into a ball and cover dough with a damp cloth and let it rest for about an hour or until double in size (My dough rest around 30 mins).
- Knock down dough to expel some air, transfer to a lightly floured surface. Here, half dough, I roll and use donut cutter to make donut shape and the other half, I divide into 25 gr each and wrap each piece with filling.
- Place the pau onto a piece of greaseproof paper or muffin case. Proof it for another 15 mins or until the shaped mantou has double.
- Stean the mantou over the high heat for about 10 mins (adjust the timing based on the pau size)
- Best serve while it hot.

Yields : 17 pcs


I am submitting this post to Aspiring Bakers #31: BaoHo-Chiak 包好吃(May 2013) hosted by Miss B of Everybody Eats Well in Flanders.

Salted Egg Yolks Custard Pau


I just cannot resist to try it, when I saw this lau sar pau at Jeannie’s blog. The pau is indeed soft & fluffy and quite satisfy with the taste the filling too. However, the filling were all leaking out during the steaming. It happened to all my pau :(  I’m not too sure, maybe it could be that I put too much filling.

I have a hard time during the photo snapping, for the first picture, I stacked up the pau (cover up the leaking part) so you can see the beauty side part only. :) And .... here is the ugliest side of pau below :(


For the filling - recipe in half with modification

Ingredients:            
55 gr Butter, room temperature
40 gr Salted egg yolks (around 3 yolks)
55 gr Caster sugar
1 tsp Vanilla extract
20 gr Corn flour
20 gr Full cream milk powder
40 gr Whipped Cream

Method:
- Start by steaming the egg yolk for 8-10 minutes or until cooked, let it cool and mash.
- Cream the butter, sugar, vanilla and salted egg yolks slightly and mix in the rest ingredients. Refrigerate the mixture until firm.
- Portion into balls. Keep refrigerated until needed.


Pau Doughreduced size of recipe
(adapted from Cooking Pleasure)

Ingredients:
250 gr Pau flour
1 tsp Instant yeast
3/4 tsp Double action baking powder
30 gr Caster sugar
140 ml lukewarm water
30 gr caster sugar
1/4 tsp vinegar (I omitted)
1 tbsp shortening

Method: (Using a Dough Mixer or Hand Knead)
- Combine all the ingredients (except shortening) in a mixing bowl. Knead until soft about 5-10 minutes. Then add in the shortening, continue to knead until soft, smooth and elastic.
- Shape into a ball and cover dough with a damp cloth and let it rest for about 20-30 mins or until double in size.
- Knock down dough to expel some air, transfer to a lightly floured surface and cut into 25 gr each.
-Shape each into a ball, flatten it, wrap each piece with filling dough and seal the bun with round on top.
- Place the pau onto a piece of greaseproof paper. Proof it for another 15 mins.
- Steam the pau over the high heat for about 10 mins (** it is advisable to adjust the steaming based on the pau size - updated 02/06/13).
- Switch off and leave paus for a further 3 minutes before uncovering to cool on rack. (This is to prevent wrinkle, rough skin).
- Best serve while it hot.

Yields : 16 pcs


I am definitely making this again but will reduce the amount filling, hopefully the filling will not ooze out on its own, and get a perfect shape of pau too :)


Earl Grey Pound Cake

 
Beside green tea (matcha) is commonly used in baking, I’ve been noticed Earl Grey is another popular tea is being used. This is my first time using it for baking, and very happy with this pound cake recipe. It yields not only soft but also moist cake with strong flavour of earl grey on it.


Ingredients
130 gr Cake flour
1/3 tsp Baking powder
7 gr Earl grey tea leaves, crushed ( approx. 3 sachets )
120 gr Unsalted butter, at room temperature
100 gr Caster sugar
2 Eggs, separated
2 tbsp Milk ( I substituted with 1 tbsp milk + 1 tbsp lime juice )

Method:
- Preheat oven to 170C. Lightly grease and line a 18cm x 8cm loaf pan with baking paper.
- Sift flour and tea leaves into a bowl. Set aside.
-Cream the butter with 50g of sugar until light and fluffy. add in the egg yolks one at a time, follow by milk. Beat well with each addition.
- Using a spatula, fold in the flour mixture till all combined. Set aside.
- In a separate bowl, beat egg white until soft peak forms, add the remaining 50g of sugar gradually and continue to beat until the egg whites are glossy and form firm peaks.
- With a spatula, fold 1/3 of egg white into butter mixture until just combined; and fold in with the remaining egg white.
- Scrape the batter into cake pan. Make a dent lengthwise in the centre.
- Bake in the pre-heated oven for 35-40 minutes, or until a skewer inserted in the center of the cake turns out clean. Let the cake cool on the wire rack.


I’m submitting this post to Aspiring Bakers #30: It's Teatime! (April 2013) hosted by Food Playground.

If you noticed my loaf cake, I still cannot successfully have the split blooming on the top part cake, can anybody sharing the technique with me? Thanks.
 

Japanese Cotton Cheesecake - Revisited


I baked this 6" cheesecake to celebrate my colleague V’s birthday. I’m glad they like it and gave good reviews on it :)

If you are interested in giving this cake a try, please see the below recipe. However, if you prefer 8" size, please refer here.


Ingredients
125 gr Cream Cheese, softened
25 gr Salted Butter, softened
50 ml Fresh Milk
½ tbsp Lemon Juice

3 Egg Yolks
30 gr Cake flour
10 gr Corn flour
pinch of salt

3 Egg Whites
1/8 tsp Cream of tartar
70 gr Caster Sugar

Method:
- Preheat oven 160C **.
- Place the softened cream cheese, butter and fresh milk in a mixing bowl and stir over double-boiler until melt and mixture is thick and creamy. Remove it from double-boiler to cool.
- Upon slightly cool, add in the egg yolks, cake flour, corn flour and lemon juice. Mix until well combined.
- Sieve the egg yolk and flour mixture into another clean bowl. Set aside.
- In another bowl, whip the egg whites in till foamy, add in cream of tartar, continue to whisk. Gradually add in the caster sugar, whisk till soft/medium peaks form.
- Add one-third of egg whites mixture into the cheese mixture and use whisk to stir well. Continue to fold gently with the balance egg white mixture until incorporated.
- Pour into the pan with grease paper and bake in water bath for 1 hour 10 mins or until set and golden brown.
- Leave to cool in oven for at least 10 mins with open door ajar. Unmold the cake, leave it cool before refrigerating it for at least 4 hours.

NOTE:
** For my oven, I first baked for 20 mins at 180C and changed to 160C for another 45 mins.


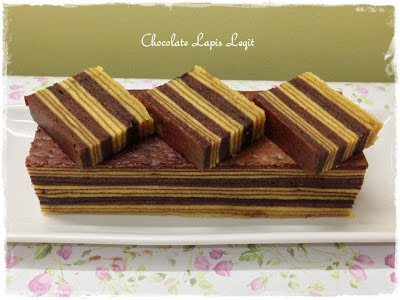
Chocolate Lapis Legit


When you see any lapis cake, I guess everyone will straight forward say
wow nice cake but fattening, time consuming to bake blah blah blah ….
so do I.

I felt lazy whenever the thought of long hours of preparing & baking it, however, for every Chinese New Year, at least I will try to bake one lapis cake (provided time is allowed). I just love the taste of rich, aromatic, moist and not to forget it is highly addictive cake…. just can’t stop at only one slice. :)

Here are “Some good tip and tricks for baking lapis cake shared by Sweet Samsations” that you may check it out before you bake.


Source : Ny Liem's Lapis Legit Coklat with modification

Ingredients:
A:
35 Egg yolks
4 Egg white
10 gr Cake Emulsifier/Ovallete

1 tsp Vanilla Extract
350 gr Icing Sugar

B:

600 gr Chilled Salted Butter
2 tbsp Condense milk

C:

50 gr Cake flour
20 gr Corn flour
20 gr Milk powder

D:

30 gr Chocolate powder
1 tbsp Chocolate paste
50 gr butter cream

Method:

- Cream butter (600+50 gr) until pale and fluffy. Put aside 50 gr of butter and will be used for Ingredients (D). Add condensed milk to the remaining 600 gr butter, cream or mix well and set aside.
- Beat Ingredients (A) until thick & fluffy. Fold in the creamy 600 gr butter – Ingredients (B) and evenly mix.
- Fold in Ingredients (C) with spatula until the mixture is well incorporated.
- Take 1/3 of the batter (around 750 gr), mix it with Ingredients (D) until incorporated, set aside.
- Place the baking paper on the preheated 9x9 inch tin. Spread thinly approx. 110 gr of yellow batter to the tin and bake the first layer at the centre rack with top-bottom heat at 200C. It should take 5-10 mins until brown.
- Then bake the next layer until the last layer using top heat. Try to bake it each layer not more than 5 mins or else, the cake will turn hard.
- Use back spoon to press lightly to flatten each layer while you mixed the batter in the tray.
- For chocolate layer, I weigh 115 gr each.
- Every three layers of yellow, I add 2 chocolate layers. Continue baking the cake by the layers until the batter uses up.
-When the last layer is finish, cover with aluminium foil, using top bottom heat …. bake the cake again at 180C for about 10 mins.
- Remove from oven and leave to cool before slicing.


I’m submitting this post to:
- Aspiring Bakers #27:Through Thick and Thin – Kue Lapis Classics hosted by Sweet Samsations
- Chinese New Year Delights 2013 hosted by Sonia aka Nasi Lemak Lover

Chocolate Chip Shortbread


Ingredients:
225 Salted butter, at room temperature
130 gr Caster Sugar ( I used only 105 gr )
½ tsp Vanilla Extract
250 gr All purpose Flour
120 gr Mini Chocolate Chips

Method:
- Beat the butter and sugar on medium speed for about 3 mins, until pale and smooth.
- Add in vanilla, then reduce mixer speed to low and add the flour, don’t overmix, stop once the flour is incorporated.
- Fold in the chocolate chips with spatula.
- Transfer the soft, sticky dough to a zipper or plastic bag (see below picture). Put the bag on a flat surface, roll on the thickness you prefer. Refrigerate the dough for at least 2 hours or for up to 2 days ( I did it one day in advance ).


- Preheat oven to 160C
- Put the hardened dough on the flat surface and slit it open. Cut the dough into 1 - 1.5 inch squares (see above picture) and transfer it to the baking sheets on the tray and carefully prick each one twice with a fork.
- Bake for 15-17mins, the shortbreads will be very pale and well baked, they shouldn’t take on much colour.
- Leave to cool thoroughly before storing in container.

Yields : One small bottle container


I am submitting this post to Chinese New Year Delights 2013 hosted by Sonia aka Nasi Lemak Lover. And also I would like to wish all have a prosperous and fruitful water snake year :)

Pandan Flavour Cookies


Source : Y3K Cookies by Alan Ooi via Happy Flour

Ingredients:
130 gr Butter
70 gr Shortening  ( I used margarine )
130 gr Icing sugar

2 Eggs
1 tsp Pandan paste

260g Cake flour
¼ tsp Baking powder
40g Hoen kwee flour or Green pea flour
20g Custard powder
20g Coconut powder

Some red dried cherries (diced) for topping (optional)

Method:
- Preheat oven to 165C.
- Sift all the flour and baking powder together and set aside.
- Cream butter, shortening and icing sugar together until light and fluffy.
- Lightly beat in the eggs and pandan paste, then add to butter batter.
- Fold in all the shifted flour to form a soft dough.
- Spoon dough into a piping bag fitted with a star nozzle and pipe onto baking tray and places the diced cherry on top.
-  Bake in a preheated oven for 15-20mins. The cookies must be well-baked but not brown.
- Leave to cool thoroughly before storing in container.

Yields : approx. one and half small container 


Not to forget J I am submitting this post to Chinese New YearDelights 2013, hosted by Sonia aka Nasi Lemak Lover.

Cheese Pineapple Tarts


Ingredients:
Dough:
150 gr Hard Butter
45 gr Icing sugar 
1 Egg Yolk
½ tsp Vanila extract
200 gr Plain Flour
40 gr Corn Flour
10 gr Parmesan cheese

1 Egg Yolk + 1 tsp water for egg wash
Shredded Cheddar Cheese for toping

Pineapple Filling

Method:
- Preheat the oven to 160C.
- Cream Butter and icing sugar until creamy & fluffy. Add egg yolk and vanilla, whisk until mixed well.
- Add cheese and combined flour (divide into 2-3 times), mix well to form a dough.
- Cover and rest dough in the fridge for 15-30 mins.
- Scale pineapple filling at 6 gr and roll into a ball.
- Pinch some dough and scale it at 7 gr each.
- Flatten the dough, place in the filling and seal into a ball.
- Brush tarts with egg wash and sprinkle the shredded cheese on top.
- Bake in a preheated oven for 20 minutes until slightly brown.
- Remove from oven and cool on a wire rack.

Yields : approx. 40-50 cookies depend on the size ( about 1 small container plus )


Here, I'm submitting this post to Chinese New Year Delights 2013, hosted by Sonia aka Nasi Lemak Lover.

Beside this, I would also like to link this post to "Pineapple Events" - Little Thumbs Up hosted by Zoe of Bake for Happy Kids, organised by Bake for Happy Kids and My Little Favourite DIY.

Photobucket