Orange - Heart Jelly Cheesecake

Another fruity dessert ! Instead of strawberry, I substituted with ready peeled mandarin oranges. :) I am submitting this post to Aspiring Bakers #5 : Fruity March (March 2011) hosted by Bakericious.


Source : Aunty Yochana

Ingredients:
Biscuit base:
300 gr Digestive Biscuits
140 gr Melted Butter

Cheese Fillings:
1 block of Philidelphia Cream Cheese
10 gr Gelatine Powder
50 gr Sugar
125 ml Hot Boiling Water
1/2 tsp. Vanilla Essence

About 20 Mandarin Oranges (I used ready peeled in S&W brand)

Topping:
1 box of Crystal Jelly Crystals – Orange flavour
250 ml Hot Boiling water
250 ml Cold water

Method:
- For biscuit base: Blend biscuits until fine and then mix with melted butter and mix thoroughly.
- Press into a 10" Square tray. Chill in the fridge to let it harden.
- For filling: stir gelatine powder, sugar with boiling hot water until it dissolves.
- Cream ‘cream cheese’ and vanilla essence till creamy, add in gelatine mixture gradually and cream until smooth. Pour on top of chilled biscuits.
- Arrange orange slice on top of cheese fillings. Put into the fridge to let it set. (Preferable 2-3 hours)
- For topping: dissolve Jelly in hot water then pour in cold water and stir well. Let it completely cool.
- Pour over the set cream cheese filling and put into the fridge again to let it set until firm.
- Slice and enjoy!!!


I was thinking that I was quite lucky to be able to do it smoothly, but ... hahahaha ... wrong at all! See the below picture. I never expected that my baking tin actually leakage when I poured the jelly onto the cheesecake. Really worry the whole jelly flush out, quickly put in the freezer to let it faster set, and the end result still looked acceptable, even though the jelly part could be higher & nicer.
( Lesson learn today : make sure your tin no leakage if you want to try this :) )

You may check on Happy Home Baking & The Sweetilycious  sharing their experience making this. 


Other pictures:

One Lovely Blog Award II

I would like to apologize not being updated my blog these few week. Received the below award first from Lena about two weeks ago, then Edith & Honey Boy. Thanks to all for dedicating this award to me :).


Here are rules to abide accepting this award :
1. Post linking back to the person that gave you the award
2. Share 7 random things about yourself ( I skip this as posted earlier )
3. Award 15 recently discovered blogs
4. Drop them a note and tell them about it.

As there are lots of wonderful blogs out there, and some of you may have got it, so I will try to pass this lovely award (hopefully to the one that have not yet received this before :) ) to:

     1. Alice from I Love. I Cook. I Bake
     2. Blessed Homemaker
     3. Eelin from The Batter Baker
     4. Jane from Passionate about Baking
     5. Jessie from Hearty Bakes
     6. Joyce from Chunky Cooky
     7. Judy from A Busy Gran's kitchen
     8. Neyeeloh from 我的厨房乐园
     9. Olivia from Food .. Love .. Passion
   10. Pei Lin from Dodol & Mochi
   11. Pook from DailyDelicious
   12. Quay Po Cooks
   13. Shirley from e 起打开幸福滋味
   14. Shirley from Kokken69
   15. Wendy from Wen's Delight
   

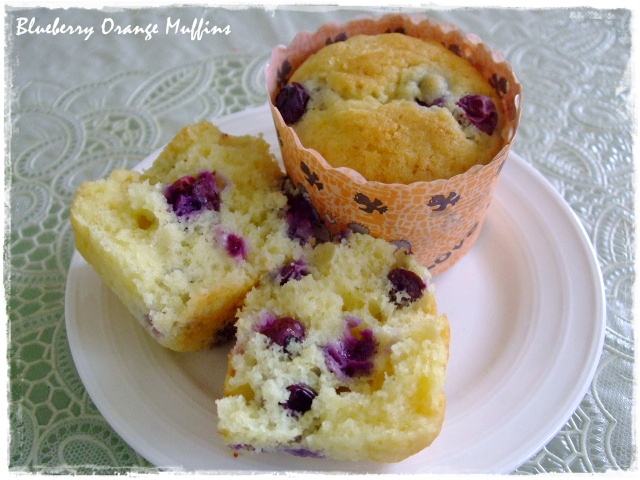
Blueberry Orange Muffins


I’m currently super busy with my office work load until almost no mood to bake. Flipped thru my long baking list and glad I found this super easy recipe. Actually I baked this few weeks ago, but only got chance to post it now. The combination of both orange & blueberries matched really well that made you can’t just stop eating it and one cupcake is never enough :)

I am submitting this post to Aspiring Bakers #5 : Fruity March (March 2011) hosted by Bakericious.

Source : Food 4 Tots & Anncoo Journal

Ingredients:
250 gr Plain flour
3 tsp Baking powder
pinch of salt
120 gr Castor sugar
2 Large eggs (at room temperature)
4 tbsp Fresh orange juice
2 tsp Orange Zest
180 ml Extra light olive oil/sunflower oil
1 tsp Vanilla extract
160 gr Greek yogurt or plain yogurt
125 gr Frozen bluerries (1 punnet)

Method:
- Preheat oven to 190C
- In a mixing bowl, sieve flour, salt and baking powder, mix well. Set aside.
- In a separate bowl, gently whisk together the eggs and sugar together, then add Greek yogurt, vanilla extract, orange juice, zest and oil until it is combined. Be careful not to overbeat the mixture.
- Add the wet mixture into the dry ingredients. Use a spatula (I used fork to mix), combine the ingredients with fold in method until they are well combined and no traces of flour. Stir in blueberries (used spatula) and mix well. Do not over-mix the batter. The batter should be thick ("spoonable" not "pourable").
- Use a spoon to scoop batter into muffin cups or transfer the batter into a piping bag and pipe into the muffin cups until each cup is 80% full.
- Bake for 20-25 mins.


Green Tea Souffle Swiss Roll


Another unique step to make swiss roll, which required cooking butter and flour first before mixing with other ingredients. I read lots of good recommendations on this roll from “OKASHI” book, texture of the cake is light and soft. Thanks Wen for sharing this great recipe.


So coincidence, my first post in March have strawberry, then I am submitting this post to Aspiring Bakers #5 : Fruity March (March 2011) hosted by Bakericious.

Recipe adapted from Keiko – Okashi via Wen’s delight

Ingredients:
1 no - Egg
3 nos - Egg yolks
1 tsp - Vanilla

35 gr - Unsalted butter
60 gr - Top flour (sifted twice)
5 gr - Green tea powder (sifted with the flour)

60 gr - Fresh milk

3 nos - Egg whites
85 gr - Castor sugar

100g - Whipping cream (I used non dairy)
2 tsp - Castor sugar (I omitted)
Strawberry (optional)

Method:
- Preheat oven 180 deg C (my oven I baked in 200C)  / Line 11" square cake pan (28cm x 28cm) with parchment paper
- Combine egg, egg yolks and vanilla in a small bowl and beat lightly. Set aside.
- Place butter in a small saucepan and heat gently until melted. Add flour to melted butter and cook through. Transfer the mixture to a mixing bowl, then add egg mixture a little at a time with a spatula till a smooth batter. Add milk and mix to incorporate. Strain the batter and set aside.
- Whisk egg white in a clean bowl and beat till foamy. Add half the sugar and continue beating for a few mins, then add remaining sugar and beat till stiff peak.
- Add 1/3 meringue into egg mixture (2) and fold in lightly, then add remaining meringue and fold till just incorporated. Pour batter into the prepared pan and spread evenly with a scaper. Bake for 20 mins.
- When is done, remove from pan and place in a big plastic bag to cool (I let it cool on top of the baking paper, which cover by plastic cling wrap for 2-3 hours) .
- Whip cream and sugar in a chilled mixing bowl till stiff peak.
- Spread the whipped cream on the cool soufle and sprinkle chopped strawberry all over. Gently roll it up into swiss roll. Chill to set before serving.


Homemade Pizza


I made simple pizza last weekend. Browsing thru internet and finally decided on this. The texture was soft, good  taste and easy to make. I only used normal ketchup sauce for the tomato paste, added diced ham, sausages, mushroom and pineapple. Finally sprinkle cheddar & mozerella cheese on top.


Pizza Base Recipe from 专业面包甜品制作 via Fatmum

Ingredients:
115 gr Bread flour
115 gr Plain flour
5 gr Salt ( I only used ½ tsp )
20gr Oil
1/2 Egg

115g Warm water
4 gr Yeast
½ tsp Sugar

Method:
- Dissolve Yeast and sugar into warm water until bubbling (or around 5-10 mins)
- Mixed all ingredients together.
- First proofing @ 2hrs ( I only proof for 1 hours) or till 2.5-3 times the size.
- Second proofing 30mins.
- Bake in preheated oven of 200C for 20mins or till golden brown.

Yield : 2 pcs 10 inch pizza base

If you bored just to make standard size pizza, and you want a bit challenge … try make cheesy bites surrounding the pizza, you may hop to Fatmum’s blog and see how creative she is.

Stained Glass Cookies


Today is Valentine’s Day, I would like to say Happy Valentine’s Day to all of you. Have you say it to your love ones, family and friends?
Say it out loud if you have not :)


I am submitting this post to Aspiring Bakers #4: Love In The Air (Feb 2011) hosted by Cuisine Paradise

Recipe adapted from Martha Stewart Holiday Cookies 2005 via E's Joie

Ingredients:
300 gr All-purpose flour, plus more for work surface
1/4 tsp Coarse salt
1/2 tsp Baking powder
110 gr Unsalted butter
225 gr Sugar
1 large egg
1 tsp pure vanilla extract
7 ounces assorted clear colored hard candies, colors separated and finely chopped (about 30)

Methods:
- Preheat oven to 325F / 160C.
- Sift together flour, salt, and baking powder into a large bowl; set aside.
- Put butter and sugar in the bowl of an electric mixer fitted with the paddle attachment; mix on medium speed until pale and fluffy, about 3 minutes.
- Add egg; mix until smooth, 1 minute.
- Reduce speed to low. Add flour mixture, and mix until combined.
- Stir in vanilla. Wrap dough in plastic, and refrigerate until cold, about 45 minutes.
- Roll out chilled dough on a well-floured surface to a little more than 1/8 inch thick. Cut out shapes using a cookie cutter. Using a metal spatula/jam knife, space 2 inches apart on baking sheets lined with parchment paper. Using the tip of a paring knife, make a cut out in center of each cookie for candy filling.
- After ready cutting all the cookies, refrigerate with the baking pan about 10-15 minutes.
- Once refrigerate, bake it for 6 minutes, taking out to fill with the cut out candies, baked for another 3 minutes to check whether the candies fill up the cookies, if not then add more candies. Don’t try to overfill the cut-out with candies otherwise they will flow out and create a stain outside
- Bake cookies until candy has melted and completely filled cutout and cookie edges are just starting to turn pale golden brown. Do not let the cookies brown, or the candy centers may become bubbly.
- Let cool completely on sheets on wire racks. Allow the cookies to cool slightly on baking sheet (for the candies to set) before transferring to wire rack for cooling. Use a metal spatula to remove cookies from parchment. Cookies can be stored in airtight containers at room temperature up to 5 days.

Yields : 3 dozen cookies


Other pictures :

Soft Walnut Chocolate Cake


This recipe caught of my eyes because of the method which is something different to the usual way of making butter cake. Here, all the ingredients are beat at one go and later mix with the creamy butter. It really yielded soft & light cake in texture and the cake was well received by my family and friends.


Source : Delicious Cakes - Amy Heng

The ingredients:
A.
6 cold eggs
40 ml cold water
1/2 tbsp ovalette
200g caster sugar

250g cake flour
1 tsp baking powder

B.
250g butter
1 tsp vanilla essence

C.
100g chopped walnuts
150g chocolate rice

Method:
- Line and grease a 10" square tin. Preheat oven at 170 degree.
- In a mixing bowl whisk the eggs, cold water, caster sugar, ovalette and the flour at top speed until the mixture turn thick and fluffy. Leave aside.
- In another bowl, beat the butter and the vanilla until light and creamy.
- Mix the creamy butter and the egg mixture together until well blended.
- Lastly add in the chopped walnut and chocolate. Pour into the prepared tin and top with the remaining chocolate rice.
- Bake in preheated oven for 40-50 minutes or until well done